Beginners guide to Hardanger embroidery
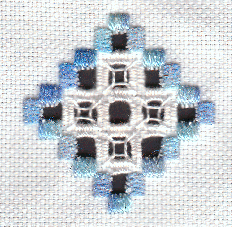 Hardanger is a counted thread embroidery technique from the Hardanger region of Norway. It is traditionally worked in white thread on white fabric with 22 holes per inch. In this beginners guide to hardanger we suggest using coloured threads (Perle no. 5 and no. 8) to make things easier for you to see what you are doing. Click here to print part 1 and part 2 of the chart.
What do I need?
6 square of hardanger 22 count fabric
pearl no 8, 1 ball
pearl no 5 1 skein
sizes 22 and 24 tapestry needles
small wooden embroidery frame
Step 1. Kloster blocks
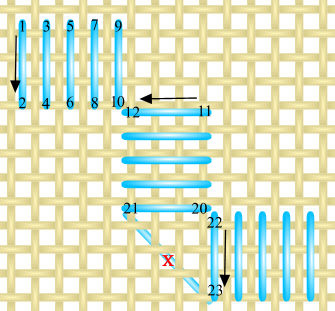 Find the centre of your fabric by folding it in half both ways and lightly creasing. Thread your needle with the thicker No. 5 thread. To begin, tie a knot in the end and take your needle down through the fabric from the right side about 3 inches to the left of the centre. Bring the needle up through the fabric 18 holes up from the centre to begin the first kloster block. Work the first five stitches as numbered in the diagram. Each stitch covers 4 fabric threads.
When you start the second block of five stitches re-use the hole numbered 10 in the first block. On completion of the second block do not carry the thread across from 21 to 23 (shown on the diagram by a line with a red cross beside it) as this will be in the way when you come to doing the cutting later. Instead re-use hole 20 and stitch the next block vertically as marked by holes 22 and 23.
Continue following the chart to work all the kloster blocks. Cut off the starting knot and run the thread end through the back of your kloster blocks to fasten off. All the kloster blocks need to be completed before any threads are cut. Do not start a new length of thread half way through a kloster block as the shine will have worn off the old thread and the change will be noticeable.
Step 2. Cutting
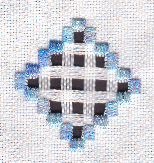 Next, take a sharp, pointed pair of scissors and begin cutting. The fabric threads to cut are shown on the chart by red lines inside the kloster blocks. Only cut threads at the end of the satin stitches, not alongside them! It is safest to slide the scissor blade underneath all four adjacent threads at once, then double check that you only have four, before cutting them in one movement. Cut as close to the satin stitches as you can but do not worry about any small tufts left afterwards. These will bury themselves in the satin stitches when the piece is washed. You should end up with your work looking something like the photograph.
© Carol Leather, X-Calibre Designs